How to Make an ID Card
Need help making ID cards for yourself or organization? Here’s the breakdown of how to easily make Custom ID Cards with IDCreator!
1. Design
Start with a free professional template or start from scratch to make a custom ID card for you or your organization.
2. Customize
Add identification details, photos, accessories, and security functionalities to your ID template individually or in bulk when making multiple ID cards.
3. Shipped
Order your ID card before 3pm MST M-F, and we’ll professionally print and ship your custom PVC ID card the same day!
ID Card Format
Standard ID Card Size & Dimensions
A CR80 card, also known as ID-1, is the ISO standardized dimensions for ID cards and credit cards used across the world. CR80 is 2.125” x 3.375”(54.02mm x 85.77mm) and has a corner radius of 0.09”(2.29mm).
Horizontal or Vertical Format
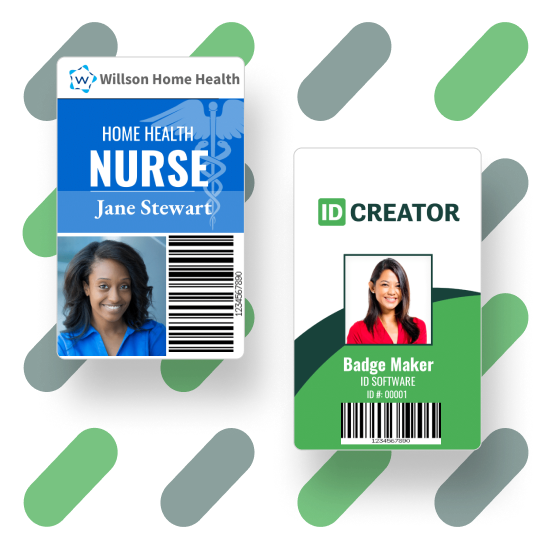
A horizontal orientation is the most common identity card format used by governments and organizations of all sizes to issue identification cards. A vertical identity card format is commonly used in Healthcare, Manufacturing, and other industries that require ID cards to be visibly displayed without the ID cards getting in the way of their work.
Front & Back of an ID Card
With limited space available on each side of an ID card, it’s important to use the frontside of the ID card for essential identifying information such as name, photo, organization name, and position. The backside of an ID card is used to display non-essential identifying information such as security features (Barcodes, QR codes, Magnetic Strips), contact information, or any other requirements.
ID Card Design
The 4 Components of an ID Card
There are 4 main components that need to be included in your ID design to make an ID card; Issuer Branding/Logo, ID Photo, ID Details, and Security Functionality. Prioritize the purpose and functionality of these components to determine their allotted space on the ID card.
Color Scheme & Branding
The color scheme of an ID card design should highlight and incorporate the colors used in your organization's branding. A balance of colors is important to any design and is used to highlight certain aspects. The color scheme of an ID card should enhance the readability and purpose of the ID card, while also promoting the brand of the organization.
Design Element Layers
With limited space available on an ID card, layering design elements (shapes, images, colors, text, logos, etc.) maximizes space to highlight or incorporate elements into the overall design. For example, layer your logo on top of a shape in a secondary brand color to highlight your logo.

How to Make Custom ID Cards
ID Card Design Template
The first step in making ID cards is to create or customize the layout and design of the ID card template. Add the larger elements (photo, logo, QR code, etc.) to your design first to establish the layout of your components. Once the large components are locked in place, layer design elements (colors, shapes, text, etc.) into your template that provides space or a background for identifying text.
Add Identification Details
Once you’ve created your ID card layout and design, add the necessary text fields (name, issued date, role, etc.) to your template. If you are using layered design elements as a background for the text, make sure the colors don’t contrast and the text remains readable. Select a font, font color, and font size to be used to highlight text elements and you can also use different sized fonts for different information.
Review your Custom ID Card
After you’ve customized your ID card template and added all of your identifying information, it’s important to save your design for either a replacement or to duplicate for a different member of your organization. Before you can order your ID card, you will have to review the design proof to make sure the printed ID card matches your design. Once you’ve reviewed the design for accuracy, we’ll print and ship your ID Cards to you the same business day!
Determining the Priorities for your ID Card
Whether you are making an ID card for yourself or your organization, knowing what you need to include on your ID card will better inform your design. Here are some questions to help you through it:
How will the ID Card be used?
Important questions to ask yourself before making an ID card.
Start with a Template
1
What should be on the front of the ID Card?
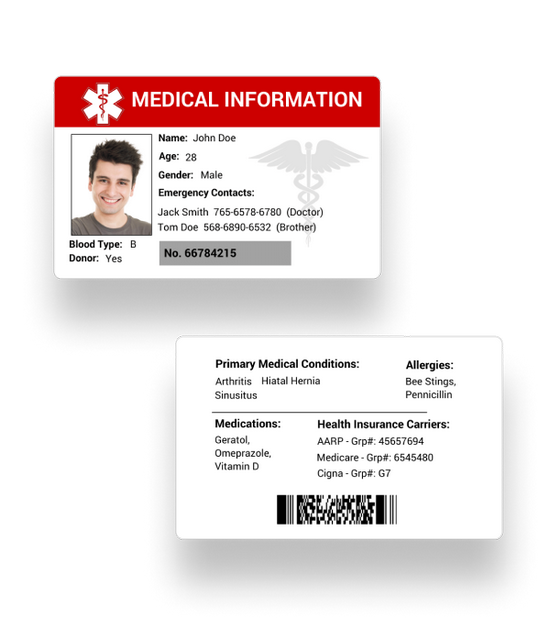
You may only need your name and photo but you can include information that's relevant to you or your organization. Role, department, name of organization, medical information, grade, issued and expiration date, contact information, date of birth, physical information, etc.
2
What information should be on the back of your ID card?
The back of an ID card can be used in many ways. Contact information in case the card is lost, less important information that doesn't fit on the front of the ID, branding images, QR codes, barcodes, etc.
3
How will the ID card be displayed?
Will the ID card need to be visible at all times or held in a wallet? Will it be a vertical or horizontal ID format? Will it be held in a badge holder, lanyard, badge reel, or need a slot punch for an ID badge clip?
Making ID Cards Has Never Been Easier!
No Minimum Order Requirements
Same Day Shipping
Free ID Templates and Design Tool
Professional Printing
1
Will the ID card be used for access control?
You can encode ID cards to regulate entry of your office or building. If your security system requires a magnetic striped ID badge, Barcode, or QR code, make sure to add the proper codes to your ID Card when designing your ID.
2
Do your ID cards need a Magnetic Stripe, Barcode, or QR Code?
Adding scannable or swipable coding to ID cards can be used for access control, member tracking, in-house spending, and many more functionalities. Create a custom QR code within the Badge Maker to add to your ID card with contact information, links, or code.
3
Color code to easily designate different roles in an organization?
Easily identify staff, students, or members, and visitors by differentiating the colors of their ID cards.
Security Functionalities
Identification cards are great tools to improve security for any organization.
Open Badge MakerStart Making your own ID Card!
Now that you've learned how to make your own ID Card, start with a premade template or start from scratch!